Pages

Monday, December 31, 2012

Daily Jewelry

Hello everyone,
Happy New Years Eve!

Do you have fine jewelry that is always on your person? Sure, chunky costume jewelry is great, but I just wanted to share my go-to pieces with you that I will always have on on a daily basis. I call them my daily jewelry:


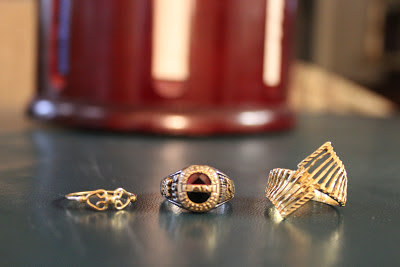
First off, I wear three rings. Honestly, I never liked rings because they would always feel so awkward on my hand, and costume jewelry never fit because I have a large ring size (8~9). Like I have said before, I am a big woman ;) I didn't start wearing rings until I bought my class ring. I finally got used to wearing it, that now, if it is off, I feel as if I am naked without it.


I love my class ring, and I wear it on my right ring finger. It is a two tone ring of sliver alloy and 14k gold accents. In the front, it is adorned by a ruby and onyx stone, which represents the colors of the highschool I graduated from. This ring was the start of my "daily jewelry." I didn't wear fine jewelry daily until I got this ring.


Next, are my two 14k gold rings that I wear on my left hand. The ring on my middle finger is one that my mother bought at a pawn shop in the early 80's. I lot of people tell me it looks like a cascading piano. The ring on my ring finger is very minimal and dainty. Don't let it's small appearance fool you - this solid gold ring means so much to me. Recently, a thief broke into my mothers home and took our safe, which was filled with my family's precious collection of fine jewelry. In the mess of the crime scene, all I found where mismatched studs and beads, until I stumbled upon this ring. My grandmother identified as hers, so the ring could date anywhere from 1940~1960. These two rings are the last part of my family's 120 year old jewelry collection. As a child, I never knew much about my family but what I did know came from the history of our jewelry. It is Spanish tradition to tell stories through gold and sliver.


Next is this beautiful sliver charm bracelet from James Avery that my boyfriend Zack gave to me on our first valentines together. I only have two charms on the bracelet: The sixteenth notes that represent me and the cowboy hat that represents him. I was a little angry that he spend over $130 dollars on me at the time, but now I feel like I have used his (lol) money's worth because I do not take it off for anything. Not even for a picture on my blog. Now we have been together for almost two years. It's our lucky charm(s).


I love this one of a kind 14k gold locket. I am sorry that I don't have to proper lens on my camera to show you the true beauty of the design on the piece. The twisted chain is also a nice addition. I was given this piece as a gift to me when I turned eight years old from a close family friend. About two years ago, when I was packing to move into the dorms, I found the locket tangled and tucked away in a jewelry box. I opened the piece to find pictures of my mother, my sister Debby and my grandmother that I did not remember. My grandmother was bald, due to the chemotherapy she had to go through when she was diagnosed with breast cancer. Thankfully, she pushed through it and the locket reminded me that if my grandmother, at her age, kicked cancer's ass, then I can get through college, even with negativity around. 


Sadly, the pictures have since fallen out of my locket. Rarely, the locket opens on it's own and after two years of use, its a surprise that the pictures have stayed in as long as they have had. Hopefully, I can figure out how I can get something to stay in there, and then I can replace the pictures, including a more current picture of my grandmother and her full head of hair. I guess by now, you should be able to tell I am more of a "gold" person.

Do you have any pieces of fine jewelry that you wear on a daily basis? Does your family treat jewelry like my culture does? What stories are behind the pieces of jewelry you own?

I treat my jewelry like tattoos - each piece has it's own memory. 

Friday, December 28, 2012

DIY- Sew a Bow

Hey guys, so I wanted to show everyone how I sew bows - mostly for my hair but these suckers can be used for anything. You can make this bow as big or as small as you want and can sew it all by hand. I use a sewing machine for most of this project - until the very end. Also, I am very sorry about the quality of photographs… Now I know to use my good camera from now on.
Anyways lets get started! Here is what you are going to need.
  • Fabric of any kind, or an old shirt. I am using a vintage velvet tank.
  • Scissors (FABIC SCISSORS WORK BEST!)
  • Marker
  • Thread and Needle (And Sewing Machine if wanted)
Ok so ugly side facing you, draw a rectangle of any size on your fabric of choice. If you are using a shirt like me, just turn it inside out. If you are using a sheet of fabric, I recommend you cut outside the rectangle generously, and trim it down after sewing (do the same with another piece, and slap them down together pretty side touching, ugly facing out). Also.. make sure you can see the line unlike me! I should have used a sliver marker.
 Ok great, now either by hand or machine sew on the lines you made. I used a simple line stitch. 
After you sew the 2 pieces of fabric, or the two sides of the shirt together, cut out your shape, as close to the stitch as possible without ruining it. Make sure to cut out rounded corners so that they turn out crisp!
Now, pinch each side, and puff out your shape like a bag of popcorn.
Make a small vertical cut on only ONE of the sides, and then turn the whole thing inside out. Make sure you poke your finger into the corners to make sure they look as best as possible.
Now cut out a little strip of your fabric to go in the middle of your bow. This is going to give the bow its shape. Because I am using a fabric like velvet, which is prone to fraying, I folded over the sides. If you are using cotton, like tee shirt fabric, just stretching it will probably do the trick.
I decided to hand sew this part, since I figured it would be hard to use a machine for this. Wrap the strip around your bow, and form the bow shape. Once you are satisfied with your bow, sew the strip together as close as to the bow as possible and cut of the excess fabric.
Woo! If you just wanted a bow you are done! :D I added a big hair clip. You can sew a pin if wanted too! 
So it came out kinda HUGE!…
Ew, I am not looking my best, what if I just left it as a bowtie.. like a sir ? :{D
Anyways, besides my awkward pictures I hope everything thing turns out well for you (: Just feel free as ask questions and send me your versions
LOOK, here is a smaller version I did from a tee shirt, the cool thing is that I was able to hide my hair clip inside the vertical cut I made.
Enjoy,

DIY - Necklace Shelf

Hey guys, check out this neat tutorial I made. I was inspired by this tutorial here, but I wanted an easier version.  I was tired of my necklaces always getting tangled so I decided to make this cool shelf for my new apartment when the semester starts. Its super cheap and makes for some cool wall art too!
Here is what you are going to need and how much it cost me.
  • A wooden shelf, NOT hollow. Thankfully I found one with hardware already installed in the back of it. (Goodwill, $3)
  • Black (or another color, black is cheap ;D) Spray Paint (Home Depot, $1) 
  • Brass Cup Hooks, I choose 1” (A pack of 40 for 4 bucks)
  • A drill, and make sure you have a smaller drill bit than the hook’s screw
  • A ruler
  • A sharpie marker, Sliver stands out on mine (SHARPIE OBSESSED. I already owned this!) 
Ok great, now that you have everything you need its time to start this project! So cleaned my shelf and much as possible and thankfully had some glue gone to get the stickyness off. After, I decided I wanted 3 rows of hooks because I have a lot of necklaces!!
So I used the ruler to make three lines on my shelf, one down the middle and 2 in-between the middle line and the edge. Don’t worry about making marks on the wood, we are going to spray paint all of it anyways. So, now I wanted to make marks where to drill. I wanted to be able to grab the necklaces without having trouble looking for the one I wanted, so I decided on a window layout. You will understand what I mean in the pictures to come. 
Since my piece of wood, or shelf, was 45 cm wide, I decided to make marks every 5 cm on the two outer lines. Of course, your shelf may be different so do some math and make the right marks for your needs. So in between the marks of the outer lines, I made a mark on the middle line. So this is what it looked like after! 
Simple! Pictures make so much more sense than my horrible grammar. Sorry about that. Anyways ONWARDS! Time to drill. I used a really small drill bit because I wanted my hooks to be on tight. Since we are going to end up screwing the cup hooks on my hand, make sure you sure a smaller drill bit than the size of the screw end on the hooks. If not, the hooks will not stay in place and fall out. This is really important
WOO! Look at me go! I have to admit, but it was my first time using a drill. You dont need to drill too deep. Just enough to get the hooks going. I would recommend to drill a hole first, and then test it by screwing in one of the hooks just to see if your drill bit is going to work for you. Easy does it!
So I was getting annoyed making all the holes, but only if I knew what was to come! This is really the most annoying part of this project - but very worth it in the end. Screw in the hooks tight and apply pressure, while making sure the face the way you need them to face. Since I used a super small drill bit, the hooks took a lot of effort to screw in place - but this means that they are very secure. I thought I was going to develop a blister after I did this..my shelf has a total of 28 hooks on it. 
So this is what my shelf looked like after the hooks. Now for the fun part, CHEAP SPRAY PAINT. Follow the directions on the can, and don’t spray too close and you should be just fine. If you rather leave the hooks the color that they came, just do the project in this order, spray, dry, THEN drill and hooks. Sigh, I had to spray paint on grass and I felt really bad about that… sorry earth :( If you newspaper please save the world!
And here is my  finished product! Happy D-I-Ying and let me know how you like this project of if you tried it. (I used a crappy camera for the whole tutorial, until the finished product, sorry I was lazy!)


ROMWE Order

Hello again everyone. Today, I ordered from Romwe.com for no charge to me! I know what your thinking, but no I was no sponsored by them... (though I wish I was). Sometimes, they have Facebook promotion contest that offer freebies, which turn out to be GIFT CARDS! Yes! I had $60 bucks to spend today. Well, my total is over 60 bucks but they have a coupon code right new for $10 off any order over $65! I'll link the items. Please let me know what you think of my order, or want anything specific out of a review I will post one I get the products.

First I ordered this galaxy dress ($43.99):
I am a little worried it won't be long enough on me, but I decided to take a risk.
After the dress, I couldn't afford very much more so I ordered some jewelry

This cross necklace ($12.99):

and this slave bracelet ($11.99):

So, on top of all of this, the first gift card came with a free pair of leggings! I got to choose the size, but not the size. I was informed that these were already sent separately. ALSO, I won their "600 free leggings" giveaway on facebook too! So ANOTHER pair of amazing leggings will be sent to me at random, lets just hope they are different designs. And all I had to do was just get likes on my personal Facebook page. I'll post pictures of everything once I get it. Although I feel lucky, it was pretty annoying having to message all my friends and be like "HEY PLZ LIK MY PIC ON MY WALL" but I have a feeling it was way worth it. 

You should also like them HERE on Facebook to try and get your own opportunity for some free stuff! And sign up for their email too. Trust me, It was worth it. According to retail value, I am getting over $100 of stuff for free thanks to my Facebook friends!

Good luck,


Thursday, December 27, 2012

Welcome!


Hello Everyone! Welcome to the grand opening of my new blog, Symphonic Spells! I am so excited to start sharing my life with you. Ok, so, I honestly have no idea what this blog's "genre" is going to be. Mostly, I will be posting about fashion and cute DIY's. I am a very crafty and cheap girl, who always trys to get the best bang for her buck.

Oh! I didn't even introduce myself! My name is Lani, and I am a 19 year old student who is studying music education. Does that make my blog name make sense? Anyways, I play the violin and my life circles around music. I currently live in Texas. Honestly, I have never been good about talking about myself, so I hope if you follow my blog maybe you will get to know me a little better. I also have crazy curly hair! Here let me show you:


Ok, well, I hope I don't seem boring, its just really late! Anyways I just wanted to get a post up on my blog.

I look foward to blogging with you! Adios!

Add caption